# Content Checker (`jakubbalada/content-checker`) Actor
Monitor a website or web page for content changes. Automatically saves before and after screenshots and sends an email notification when content changes are detected.
- **URL**: https://apify.com/jakubbalada/content-checker.md
- **Developed by:** [Jakub Balada](https://apify.com/jakubbalada) (community)
- **Categories:** Automation, Open source
- **Features:** Full permissions
- **Stats:** 2,249 total users, 119 monthly users, 38.7% runs succeeded, 70 bookmarks
- **User rating**: 4.89 out of 5 stars
## Pricing
Pay per usage
This Actor is paid per platform usage. The Actor is free to use, and you only pay for the Apify platform usage, which gets cheaper the higher subscription plan you have.
Learn more: https://docs.apify.com/actors/running/actors-in-store.md#pay-per-usage
## What's an Apify Actor?
An Actor is a serverless cloud program that runs on the Apify platform. It has two run modes.
In Batch mode, an Actor accepts a well-defined JSON input, performs an action which can take anything from a few seconds to a few hours,
and optionally produces a well-defined JSON output, datasets with results, or files in key-value store.
In Standby mode, an Actor provides a web server which can be used as a website, API, or an MCP server.
Apify vocabulary and the platform model are defined once, in the agent quickstart at https://apify.com/agents.md.
## How to integrate an Actor?
If asked about integration, you help developers integrate Actors into their projects.
You adapt to their stack and deliver integrations that are safe, well-documented, and production-ready.
Do not guess an integration path. Every one of them is in the agent quickstart at https://apify.com/agents.md: the Apify MCP server, Agent Skills with the Apify CLI, the JavaScript and Python clients, the REST API, and the account-free path for an agent with no human to sign in. It also carries the rule on stating cost before the first paid run.
For examples already wired to this Actor's own input schema, see the [API](#api) section below.
Each client library has reference documentation the quickstart does not restate: [JavaScript/TypeScript](https://docs.apify.com/api/client/js/docs.md) (`npm install apify-client`) and [Python](https://docs.apify.com/api/client/python/docs.md) (`pip install apify-client`).
# README
## Content Checker
### What does Content Checker do?
This actor lets you monitor specific content on any web page and sends an email notification with before and after screenshots whenever that content changes. You can use this to create your own watchdog for prices, product updates, sales, competitors, or to track changes in any content that you want to keep an eye on.
Technically, it extracts text by selector and compares it with the previous run. If there is any change, it runs another actor to send an email notification, save, and send screenshots.
### How to use Content Checker
Watch our [video guide](https://www.youtube.com/watch?v=89k9JzWfS_U) or read our [blog post](https://blog.apify.com/how-to-set-up-a-content-change-watchdog-for-any-website-in-5-minutes-460843b12271) for a step-by-step tutorial to get you started.
[](https://youtu.be/89k9JzWfS_U)
### Input
The actor needs a URL, content selector, and an email address. A screenshot selector can also be defined or, if not defined, the content selector is used for the screenshot.
For detailed input description please see the [Input page](https://apify.com/jakubbalada/content-checker/input-schema).
### Output
Once the actor finishes, it will update content and screenshot in a named key-value store associated with the actor/task.
If the content changed, another actor is called to send an email notification.
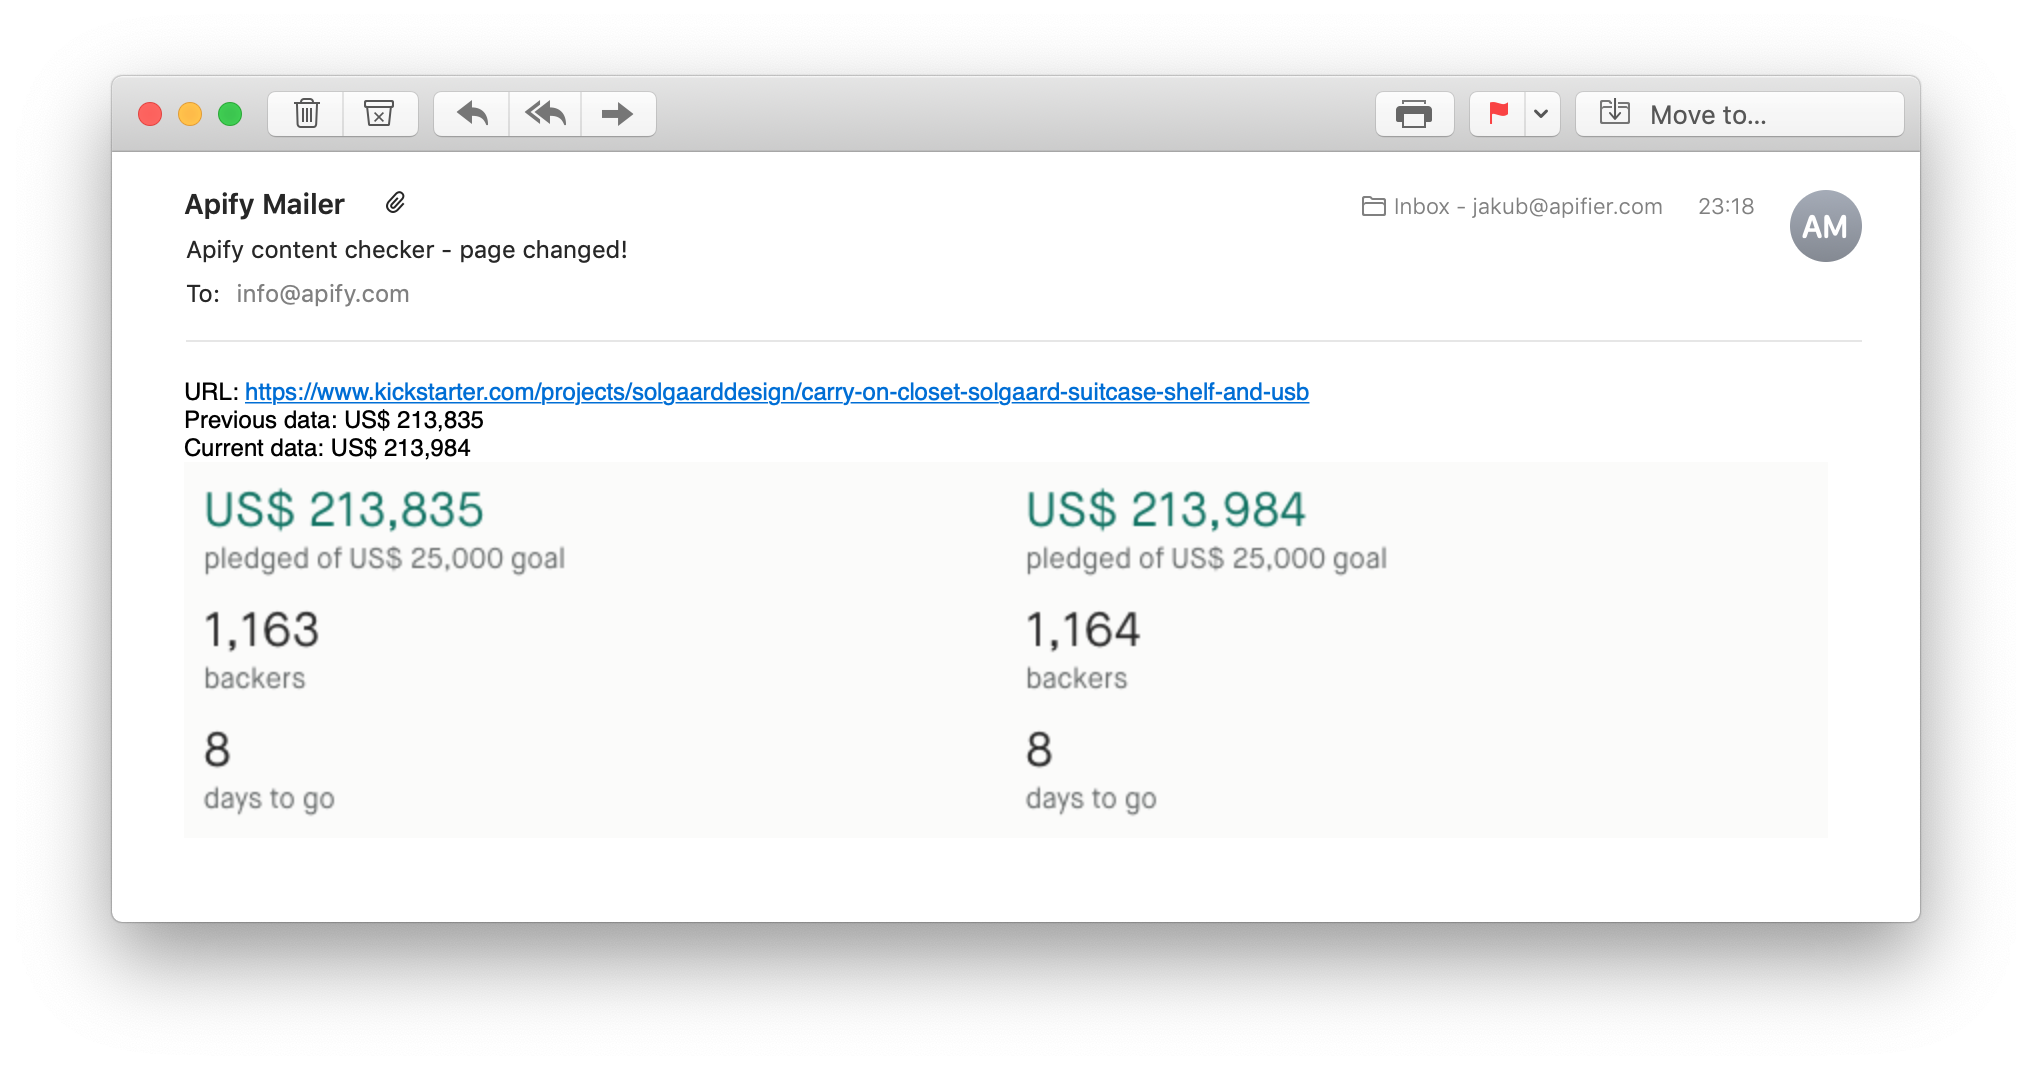
Here's an example of an email notification with previous data, changed data, and two screenshots:
 ### Integrations and Content Checker
Content Checker can be connected with almost any cloud service or web app thanks to [integrations on the Apify platform]([https://apify.com/integrations]\(https://apify.com/integrations\)). Integrate with Make, Zapier, Slack, Airbyte, GitHub, Google Sheets, Google Drive, and more. Or you can use webhooks to carry out an action whenever an event occurs, e.g. get a notification whenever Content Checker successfully finishes a run.
#### Send notification on change only
If you only want to get a notification on change and don't want to use a direct email via `sendNotificationTo` input field, you can utilize the fact that a dataset item is pushed on change. Go to monitoring and set up an alert that will trigger if more than 0 items are pushed to dataset. That happens only when content changes.
### Using Content Checker with the Apify API
The Apify API gives you programmatic access to the Apify platform. The API is organized around RESTful HTTP endpoints that enable you to manage, schedule, and run Apify actors. The API also lets you access any datasets, monitor actor performance, fetch results, create and update versions, and more. To access the API using Node.js, use the apify-client NPM package. To access the API using Python, use the apify-client PyPI package. Check out the [Apify API reference]([https://docs.apify.com/api/v2]\(https://docs.apify.com/api/v2\)) docs for full details or click on the [API tab](https://apify.com/jakubbalada/content-checker/api) for code examples.
### Not your cup of tea? Build your own scraper.
Content checker doesn’t exactly do what you need? You can always build your own! We have various [scraper templates](https://apify.com/templates) in Python, JavaScript, and TypeScript to get you started. Alternatively, you can write it from scratch using our [open-source library Crawlee](https://crawlee.dev/). You can keep the scraper to yourself or make it public by adding it to Apify Store (and [find users](https://blog.apify.com/make-regular-passive-income-developing-web-automation-actors-b0392278d085/) for it).
Or let us know if you need a [custom scraping solution](https://apify.com/custom-solutions).
### Your feedback
We’re always working on improving the performance of our Actors. So if you’ve got any technical feedback for Facebook Hashtag Scraper or simply found a bug, please create an issue on the Actor’s [Issues tab](https://console.apify.com/actors/ctMjXHGFjGPwBzCrq/issues) in Apify Console.
### Changelog
Keep up with recent fixes and new features by reading the [Changelog](https://github.com/apify/actor-content-checker/blob/master/CHANGELOG.md).
# Changelog
This Actor's version history is a separate document: https://apify.com/jakubbalada/content-checker/changelog.md
# Actor input Schema
## `url` (type: `string`):
URL of a web page to be monitored
## `contentSelector` (type: `string`):
CSS selector of an area you want to monitor
## `screenshotSelector` (type: `string`):
CSS selector of a screenshot you want to get
## `sendNotificationTo` (type: `string`):
Email address where you want to get the notification
## `sendNotificationText` (type: `string`):
Optional text to include in the email notification.
## `informOnError` (type: `string`):
In case of the problem with selectors on the page, you will get notification mail
with the screenshot of the page attached.
## `proxy` (type: `object`):
Select a proxy if the target website is blocking your access.
## `navigationTimeout` (type: `integer`):
How long it should wait, in milliseconds, until the page times out
## `retryStrategy` (type: `string`):
Sometimes the page doesn't load properly or the actor gets blocked so retrying those helps. On the other hand retrying wrong selector doesn't help. The recognition of blocked pages is not perfect (about 80%).
## `maxRetries` (type: `integer`):
How many times the actor should retry in case of error.
## Actor input object example
```json
{
"url": "https://www.apify.com/change-log",
"contentSelector": "article",
"screenshotSelector": "article",
"sendNotificationText": "Apify found a new change!",
"informOnError": "false",
"proxy": {
"useApifyProxy": true
},
"navigationTimeout": 30000,
"retryStrategy": "on-block",
"maxRetries": 5
}
```
# API
You can run this Actor programmatically using our API. Below are code examples in JavaScript, Python, and CLI, as well as the OpenAPI specification and MCP server setup.
## JavaScript example
```javascript
import { ApifyClient } from 'apify-client';
// Initialize the ApifyClient with your Apify API token
// Replace the '' with your token
const client = new ApifyClient({
token: '',
});
// Prepare Actor input
const input = {
"url": "https://www.apify.com/change-log",
"contentSelector": "article",
"screenshotSelector": "article",
"sendNotificationText": "Apify found a new change!",
"proxy": {
"useApifyProxy": true
},
"navigationTimeout": 30000
};
// Run the Actor and wait for it to finish
const run = await client.actor("jakubbalada/content-checker").call(input);
// Fetch and print Actor results from the run's dataset (if any)
console.log('Results from dataset');
console.log(`💾 Check your data here: https://console.apify.com/storage/datasets/${run.defaultDatasetId}`);
const { items } = await client.dataset(run.defaultDatasetId).listItems();
items.forEach((item) => {
console.dir(item);
});
// 📚 Want to learn more 📖? Go to → https://docs.apify.com/api/client/js/docs
```
## Python example
```python
from apify_client import ApifyClient
# Initialize the ApifyClient with your Apify API token
# Replace '' with your token.
client = ApifyClient("")
# Prepare the Actor input
run_input = {
"url": "https://www.apify.com/change-log",
"contentSelector": "article",
"screenshotSelector": "article",
"sendNotificationText": "Apify found a new change!",
"proxy": { "useApifyProxy": True },
"navigationTimeout": 30000,
}
# Run the Actor and wait for it to finish
run = client.actor("jakubbalada/content-checker").call(run_input=run_input)
# Fetch and print Actor results from the run's dataset (if there are any)
print(f"💾 Check your data here: https://console.apify.com/storage/datasets/{run.default_dataset_id}")
for item in client.dataset(run.default_dataset_id).iterate_items():
print(item)
# 📚 Want to learn more 📖? Go to → https://docs.apify.com/api/client/python/docs/quick-start
```
## CLI example
```bash
echo '{
"url": "https://www.apify.com/change-log",
"contentSelector": "article",
"screenshotSelector": "article",
"sendNotificationText": "Apify found a new change!",
"proxy": {
"useApifyProxy": true
},
"navigationTimeout": 30000
}' |
apify call jakubbalada/content-checker --silent --output-dataset
```
## MCP server setup
```json
{
"mcpServers": {
"apify": {
"type": "http",
"url": "https://mcp.apify.com/?tools=fetch-actor-details,jakubbalada/content-checker"
}
}
}
```
The hosted server signs you in with OAuth on first connect, so no API token belongs in this config. Clients without OAuth support can send an `Authorization: Bearer ` header instead, using a token from API & Integrations in Apify Console (https://console.apify.com/settings/integrations).
## OpenAPI specification
Download the OpenAPI definition: https://api.apify.com/v2/actors/ctMjXHGFjGPwBzCrq/builds/HrGtcvUhEdL1kTOba/openapi.json